Have you seen this? WOW!

I found it on Pinterest as part of this picture. Unfortunately it didn’t link to any website at all so I’ve no idea from where it originated.

It is not too clear what is going on but I do recognise a crochet hook; just not one with so many loops on it!
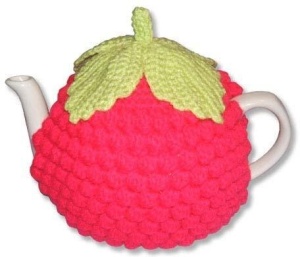
I can produce your usual crochet raspberry stitch like the one that used to form this lovely teapot cover below found at Hunkydory Home

But have never come across this before.

Can anyone enlighten me?
It would make a lovely child’s purse.
Love, Lucie xx

Hi Lucie. I think if you look at it the instructions tell you take up 3 or 4 loops in each of the places indicated and then go into the last place, draw a loop through and take off all the loops, that is the red row. then you just go back on the green row doing three [or is four] long trebles or double trebles into the top. It is very similar to what you did before for the tea cosy. The pictures are pretty good, I am sure you will be able to do if fine. Show us the results.
LikeLike
Whoops, the instructions actually tell you that it is five green loops, and pull them up in the same way.
LikeLike
This looks great, if a little complicated if you have never tried to do a raspberry stitch before, I think I should start with a basic version before tackling this. Thats another thing on my ever growing list of things to try!
LikeLike
I know what you mean. Not enough days in the week!
LikeLike
Me again – you really are a hazard to health. Of course my OCD wouldn’t leave me alone until I found hook and yarn and tried it. I first discovered there were plenty of tutorials on YouTube for raspberry crochet stitch, but I found that this wasn’t it entirely. This is how I did it..
I made a foundation row multiple of 4 plus 2 turning chains.[e.g.30 ~ 7×4+2=30] I did a second row of double crochet into each chain [30dc. – the end one is to turn].
RED ROW; double crochet into 2nd & 3rd dc from hook [3dcs, 1st is turning ch. ] miss a dc. into next dc. make *1dc,3tr.1dc.into the same stitch. then 1dc.into next 3sts. * and repeat to end. You have a row of shells, not raspberries. It is the GREEN ROW that makes the raspberry top. this is work from the front, right to left [don’t turn your work round when you get to the end of the red row. in this row you make a dc into next 3st, then into the top of your shell only, make a treble into the top of middle three treble, but leave the last loop on the hook, draw up and pull the loop through all four loop [this replaces the 1dc.in the prev.r ed row.]work to end and TURN. YOU NOW DO ANOTHER RED ROW FROM THE BACK WORKING A SHELL AS BEFORE INTO THE TOP OF MIDDLE GREEN D.C. OF THE PREVIOUS ROW, GOING RIGHT BACK THROUGH THE PREV.RED D.C. [this covers the green sts.],THEN DO A D.C. INTO THE TOP OF GROUP OF GREEN TREBLES. I’ll try and do some pictures tomorrow of how I did it, the light isn’t good at the moment. Hope you understand all this.
LikeLiked by 1 person
You are amazing! And so fast! I knew it wasn’t as simple as the ordinary raspberry stitch as I knew how to do those.
I will have a go with your instructions over the weekend and get back to you. You’ve certainly saved me a heap of work. I always like to conquer something unusual. 😉
LikeLiked by 1 person
Amazing. It is so effective.
LikeLike
Hello from Treasure Island, Florida USA
Here is the Tutorial you thought was awesome. It is a Tunisian Strawberry Stitch:
http://www.mooglyblog.com/tunisian-strawberry-stitch/
Enjoy! Deanna
LikeLike
Wow! Brilliant! I’ll try it out and link your post in. I get so much traffic to this little post, it’s only fair to steer it in your direction!
LikeLike