Well hello everyone. This is my first blog post for the Minerva Crafts Blogger Network. So you’ll find a copy of this on their site today too. This has given me real opportunity to work outside my stash! I thoroughly enjoyed riffling through the Minerva website to find the materials for the projects I had in mind.
I was thrilled to receive my first parcel. Not so thrilled when the parcel was delivered 4 days after its due date meaning I had one less weekend to make up my first project. Hey ho.

With the heightened interest in the Clover Pom Pom makers, featured on Kirstie Allsop’s Christmas show, I was keen to find another use for the humble pom pom beyond bobble hats and gift wrapping.

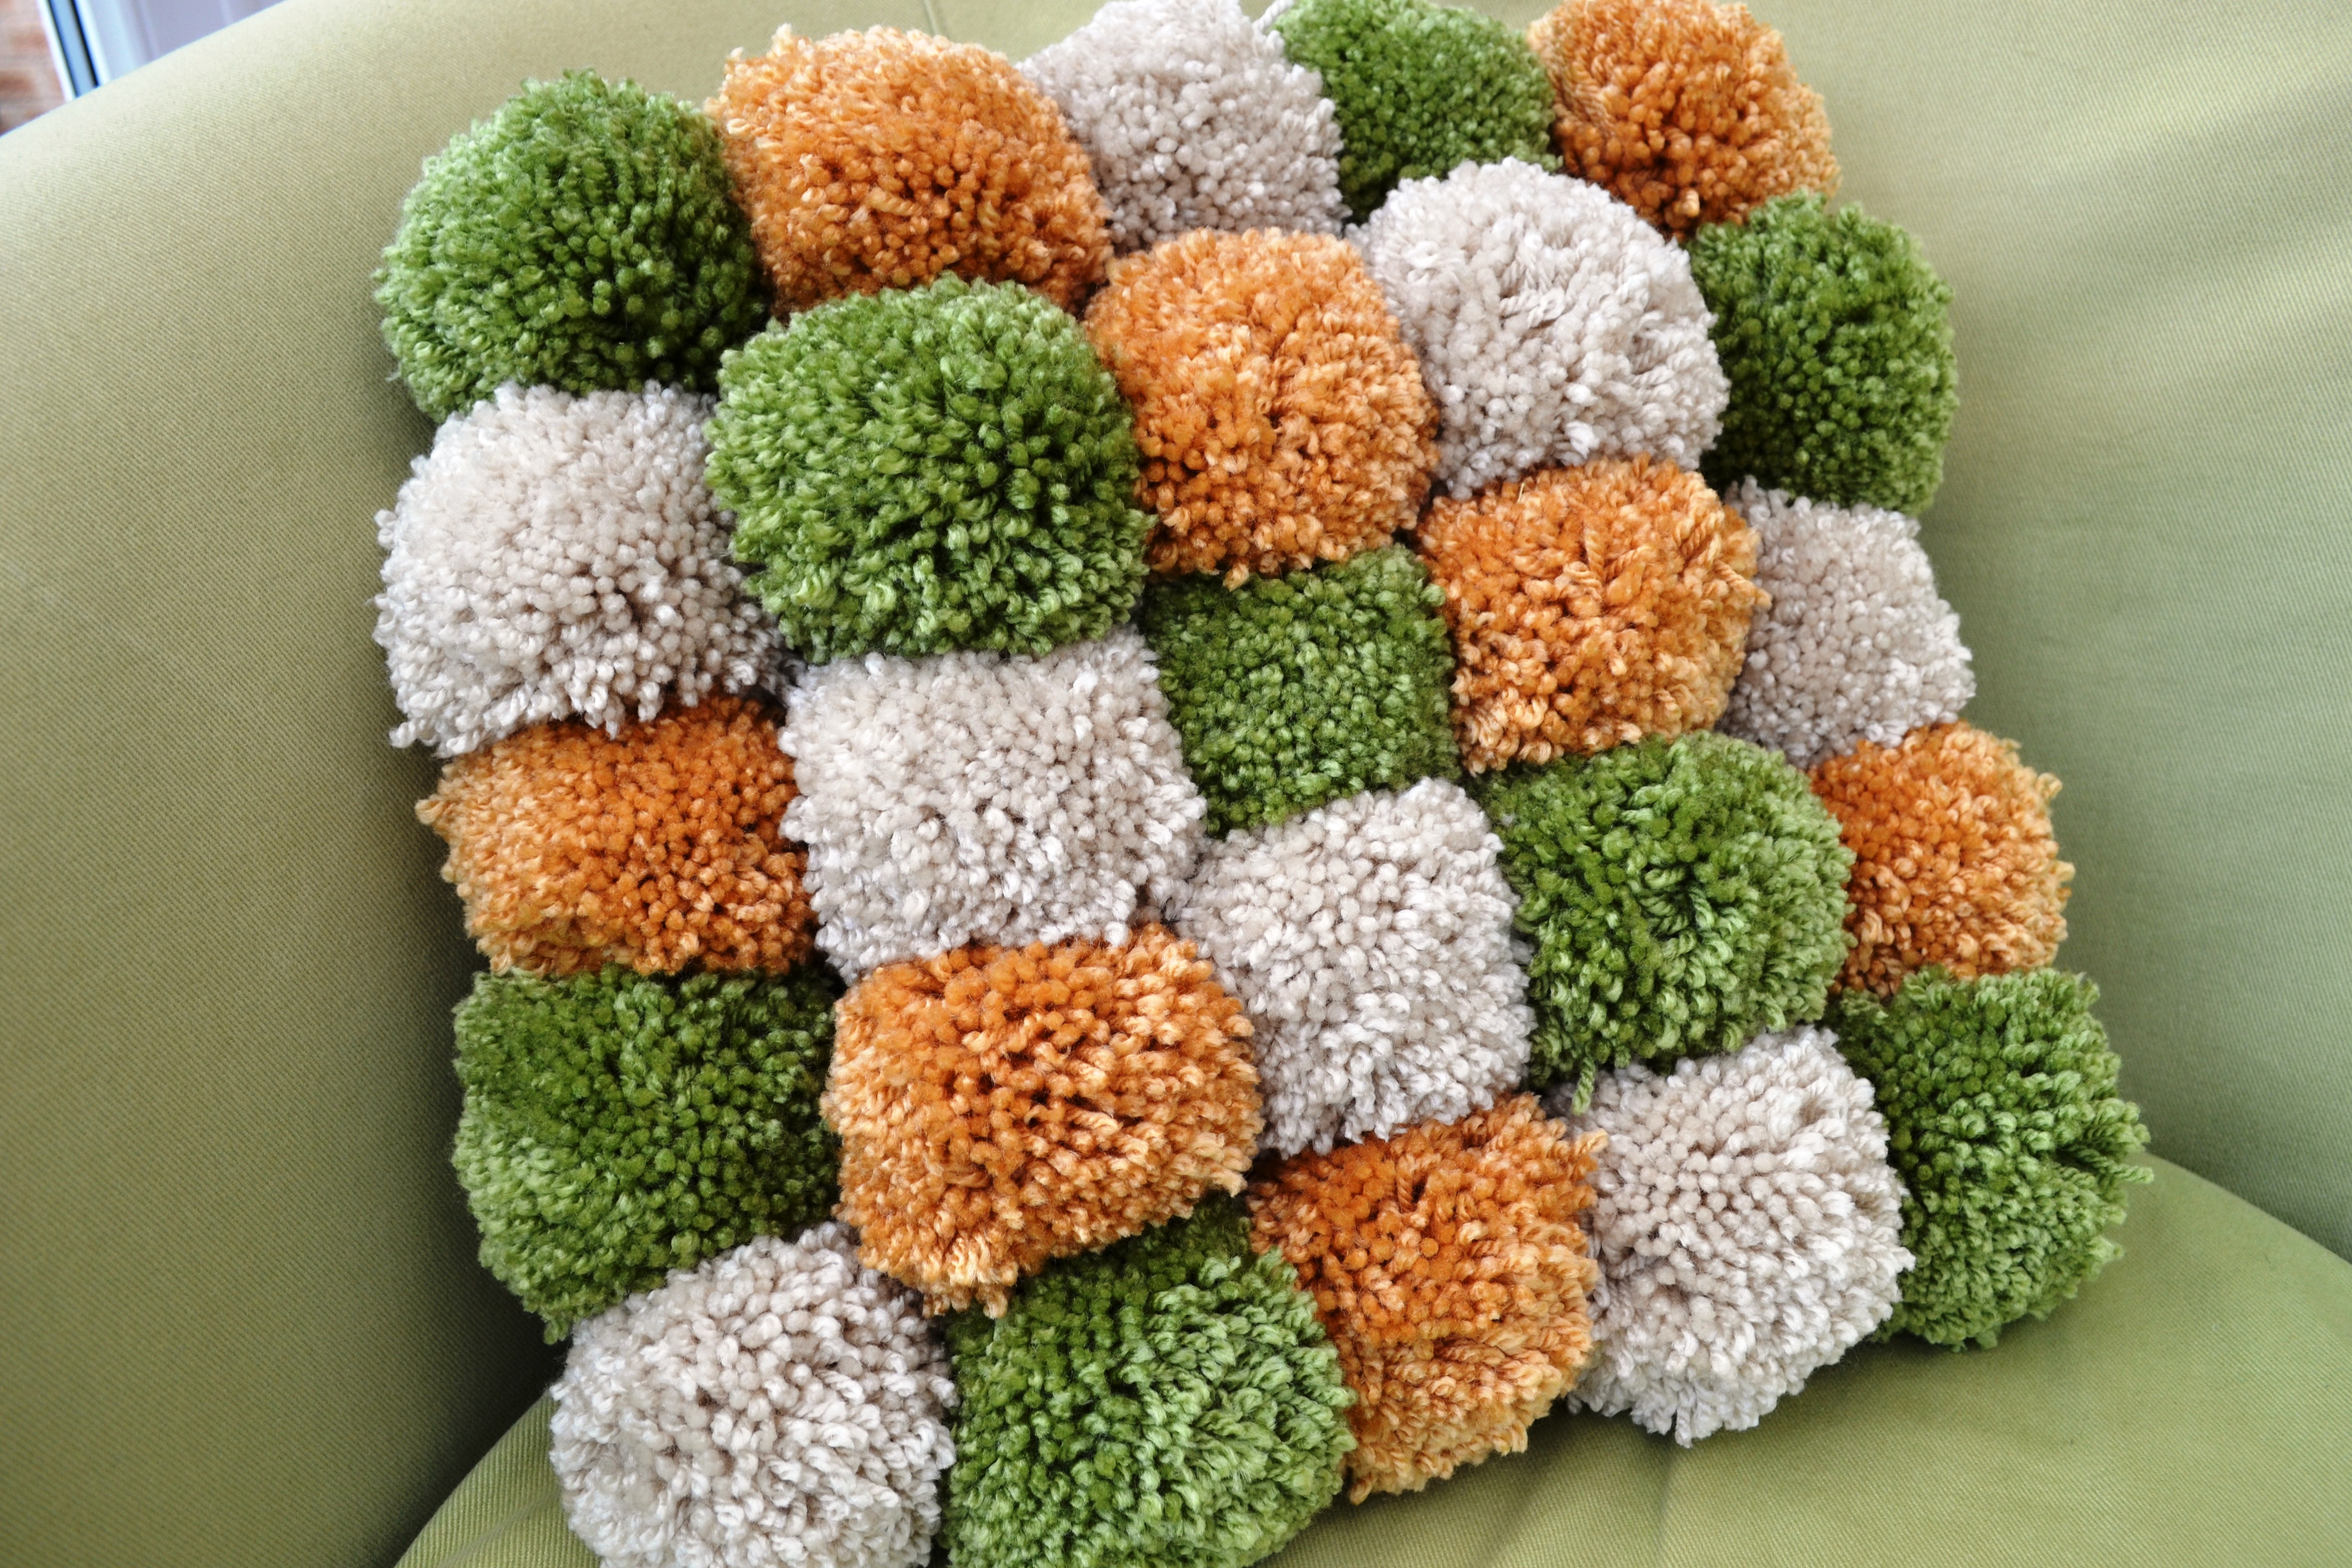
So here we go, my Pom pom cushion.
Some practice pom pom making with my pom pom maker and a 100g ball of aran weight yarn allowed me to work out how many pom poms I would get from each 100g and how ‘full’ I wanted the pom poms to be. I also realised that it was fairly tricky to get your pom poms all the same size/fullness by ‘eye’ and I wanted an even size across my cushion. My cushion will be 5 pom poms wide by 5 pom poms deep. 25 pom poms! I drew up a little diagram to work out how many I would need of each colour.
So my first job with my new Stylecraft aran weight yarn was to wind each 100g ball into 12g balls, giving 8 balls per 100g, 2 balls for each pom pom. This didn’t take long; about 1.5 hrs to wind up 7 x 100g balls although my OH thought me a little strange winding and weighing out yarn in front of the TV.

Then the fun bit, making the pom poms.
I used the blue ‘large’ pom pom maker. They are incredibly easy to use. Just open them out and wind the wool evenly around the arc. Then close them up and while holding it together cut within the groves as shown.


Then tie a length of yarn around the middle, wrapping around twice and tying tightly with a good old granny knot.
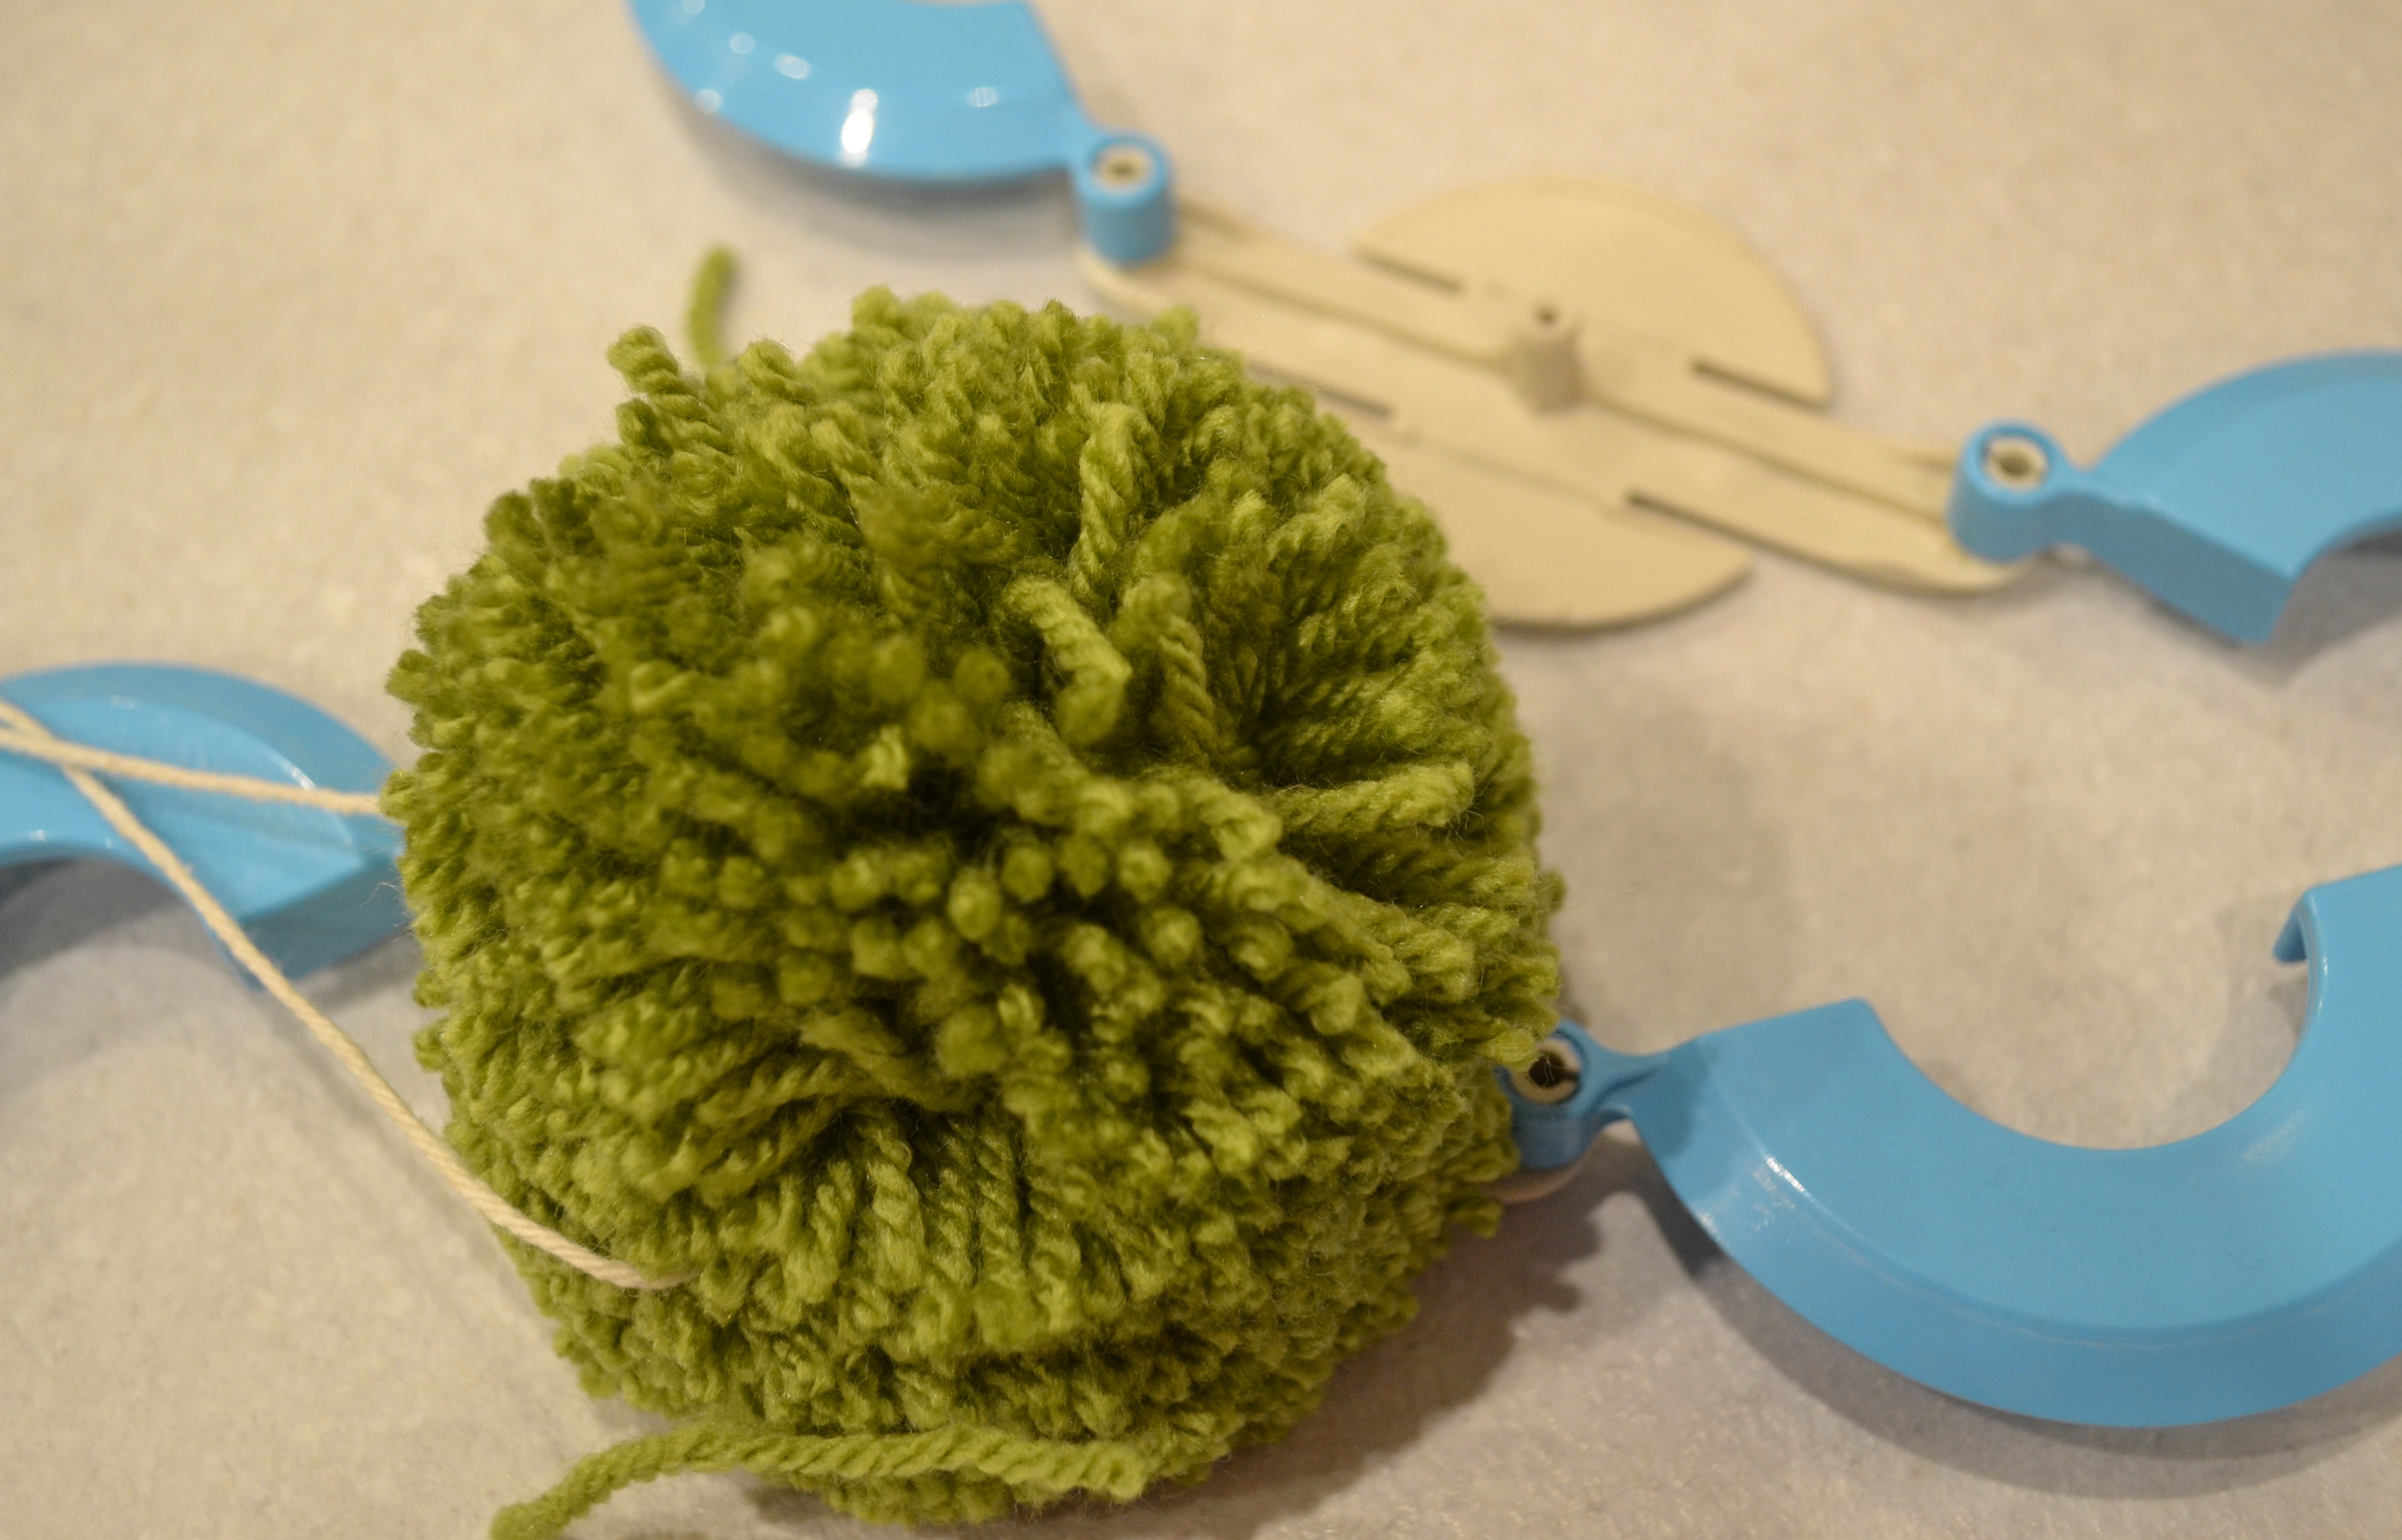
Notice I have used string around my pom pom. This is because I want to tie it onto my cushion. I would be concerned about the robustness of using the yarn to do this. You won’t see it any way. Notice also I have left a decent length of string. Your pom poms may need a little trim.

Next the cushion cover. I do not intend to be washing this cushion cover. You could try, the yarn is acrylic and designed for frequent washing but I wouldn’t recommend it! With that in mind I have not bothered with a zip or an envelope closure. Purely your preference. My cushion pad measures 40cm x 40cm. But I made up my actual cushion cover 35cm x 35cm. (The addition of the poms will make it larger then this). I cut open the pad and removed about a third of the stuffing before sewing it back up.
Before assembling the cover, you need to make a way of fixing the pom poms. I came up with this. 5 strips of the cushion fabric 4cm wide, 40cm long, folded lengthways, pressed and sown.
 Then I attached 5 strips 6cm apart as shown in the image below before assembling the cushion.

Do you see that I have left gaps along the stitching? Starting from the middle I marked every 6cm along the strip and left a gap at this point. This is how I will tie the pompoms onto the cushion pad. After a run through with the pom poms I went back and tied the front of the cushion to the back with a long needle and a couple of buttons.
 This made the cushion ‘flatter’ which made the pom poms sit more snuggly together.
Then all you have to do is tightly tie the pom poms onto the cushion, pulling the string and knotting it really tightly before cutting off the ends.
And voila!

So there we go. My daughter said it was ‘cool’. That’s enough praise for me.
I hope you enjoyed my first Minerva Crafts post. Looking forward to the next one!
Love, Lucie xx

WOW! Stunning.
LikeLike
Thank you! I enjoyed making it.
LikeLike
ahhhh it looks so cuddly! a lovely idea – and well done on your first project 🙂
LikeLike
It is really cuddly. I have to keep it from the cat though!
LikeLike
love your pom pom cushion! and the colours are devine
LikeLike
Thanks. So does the cat. I have visions of coming home to 25 dissected pom poms!
LikeLike
Some good tips here Lucie, thanks.
Will it be allowed to stay there on that sofa??:)
LikeLike
Sofa so good !;)
LikeLike
Well hello, that is a fabulous cushion! Great work Lucie, I love it!
LikeLike
Thanks for the praise. I’m really pleased with it.
LikeLike
This looks great! I got a heart shaped pom-pom maker for my birthday and they take a little more trimming to get the right shape but they look great. I’ve just ordered the large round one too so I think I’m going to end up with pom-pom embelishments all over the house!
LikeLike
I shall be going to town with pom pom bunting next Christmas. A great way to smash the stash. Heart pom pom bunting would look divine.
LikeLike
I’ll post some pics when I get it done! I wonder if Kirsty Allsop realised what she was unleashing last Christmas? I don’t know about yarn bombing – I wonder if anyone’s tried pom-pom-bombing yet?
LikeLike
🙂
LikeLike
I agree with your daughter, Cool!!
LikeLike
Thank you. It is a favorite make of mine!
LikeLike
Well done you, what a fab looking cushion 🙂
LikeLike
Super squishy! Thanks.
LikeLike
Very unique, I like it! 🙂
LikeLike
Thanks. I’ve not seen one before so hopefully it is one the first of many!
LikeLike
I love this idea! How cute this would be for baby gifts. Thanks for the post!
LikeLike
I think it would be lovely made up in pinks and reds!
LikeLike
I’m still not a Pom Pom lover but it is cool. I was wondering how you were going to attach it all together…. Impressed.
LikeLike
Ha, ha! Well life wouldn’t be very interesting if we all liked the same thing!
LikeLike
I love this project! I may have to put my pompom maker to use finally!
LikeLike
Thank you. I’m so pleased to come up with another use for the pom pom!
LikeLike
Love, love and love this!! Sharing on my FB page!!
LikeLike
Oh, thank you so much. I’ve had some great feed back on this make.
LikeLike
Oh I will bet you have!! It is fun, and lovely!
LikeLike
I would spend all day stroking it!
LikeLike
It is indeed very tactile.;)
LikeLike
🙂
LikeLike
It looks brilliant! Love the colours as well.
LikeLike
I’m thrilled with all the wonderful feedback I’ve received from this make. Thank you for stopping by.
LikeLike
My 3 sons all love it! So do I x
LikeLike
Thank you so much. I find my daughter has nabbed it whenever I get to sit on the settee!
LikeLike
Love the look, also the way you fix the pompoms. x
LikeLike
That was the really tricky part that I had to work out. I was trying to come up with something simple but sturdy and didn’t involve any further expense.
LikeLike
It’s so lovely! I learnt at Christmas how to make pom pom by wrapping the wool round your hand and then trimming like mad afterwards and went a bit pom pom crazy! Then we visited some relatives who had this very pom pom maker and spent a whole afternoon making pom poms with them! (overuse of the word pom here sorry!)
LikeLike
I can tell you that there will be so many more pom poms around this house next Christmas! And a great stash buster too. I couldn’t believe how much yarn I got through!
LikeLike
I love this, it looks such fun and the colours are lovely. I have added pom poms onto my slippers. it’s a great way to use odd balls or half balls of wool too.
LikeLike
Funnily enough I’ve just spotted some slippers with pom poms in a new book I’ve just bought so watch this space!
LikeLike
I echo your daughter’s comment – it is very cool, and a clever make too.
LikeLike
Thank you so much. I’ve had such lovely feedback about this make. 😊
LikeLike
Oh my goodness, LOVE it!!!!
LikeLike
Thanks. One of my favorites!
LikeLike
It is pom pom – ilicious! Love the colours and the design is wonderful. Finished so precisely and neatly as all your makes are. An inspiration indeed xxx
LikeLike
Do you think it can be done into a blanket or throw? I am post surgery and confined for 6 weeks. It may help spend the time. I have several of these Clover pom pom makers.
LikeLike
I’ve seen them made into a rug for next to a bed. You use one of those door mats that are made up of a hessian grid, the sort that is good to knock mud off, to tie the pom poms onto. Or you could tie the pom poms onto the plastic grid that you use for rug making. A random rug of different sized coloured pom poms would look lovely and certainly keep you busy.
I’m not sure they are practical enough for a throw. I think that with that sort of use you would soon start to loose bits of yarn. Wishing you a successful recovery.x
LikeLike